I recently wrote some criticism of a couple very promising new applications: ScreenFlow and Opacity. Both these apps came out at roughly the same time, and each was of particular interest to me. Each also had some pretty glaring bugs.
One of the great things about being a member of the Mac Community is that it actually is a community. Loosely, It's a group of people with similar interests and ideas about the computing experience. And Mac software developers — perhaps more than anyone — feel keenly this bond. At least the good ones do.
So, in true Mac Community fashion, shortly after my initial reviews (like, the next day) I got comments from the developers of ScreenFlow and Opacity. And those comments basically said, "Hey, I addressed the bugs you mentioned, and have released an update to my software. Check it out!"
I have checked it out. And it is good.
Unfortunately, I don't have time to do a complete review of these products. And I'm sure that someone more qualified will beat me to it in any case. But I did want to mention a few things about each.
ScreenFlow
ScreenFlow is a revolutionary approach to screen capturing and screen-based presentation. It is a complete environment for creating computer-screen-based presentations, in fact, letting you capture both your computer screen, its audio, and the video and audio from an external camera all at the same time. ScreenFlow then drops you into a very elegant editing mode that allows you to do all sorts of tricks specifically designed for screencasts (the Callout Actions are particularly nice).
I had a few problems with the 1.0 version, but I'm happy to report that the latest update, v. 1.0.1, fixes them all. I've been playing around with it a lot, and I can't say I've really had any problems at all, at least on my home machine. My work machine sports a 30" monitor, however, and ScreenFlow has problems with its native resolutions. The good news is, it says so:
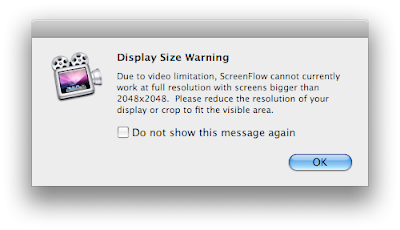 ScreenFlow Alert: Better Late than Never(click image for larger view)
The bad news is that this alert comes up after you've captured your too-big screen. Still, it's absolutely crucial information, and this alert is better than the nothing we had in version 1.0. I'll take it.
Otherwise, ScreenFlow has been a complete joy to use, and I do anticipate buying it for our lab at some point, probably in the summer. I've even showed it to my boss, who was duly impressed.
If you're looking for such a beast, ScreenFlow makes all the others I've tried pale in comparison.
Opacity
Opacity is a graphics app dedicated to creating, editing and outputting screen graphics — for the web, applications or desktop icons. As an occasional icon creator I can tell you, something like this has been a long time coming. In the past I've used a combination of Illustrator, Photoshop and the IconBuilder plug-in for Photoshop to create icons. Opacity costs only slightly more than IconBuilder, and it doesn't require Photoshop. In fact, it doesn't require anything. It, like ScreenFlow, is a dedicated environment for doing one thing. Unified, task-based apps like this are all the rage right now, and I for one think it's great.
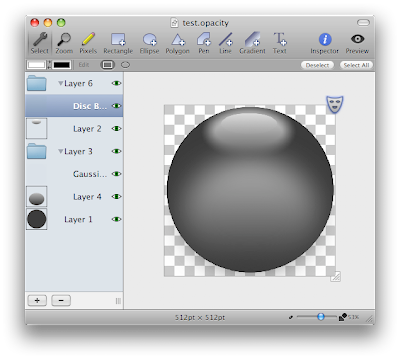 Opacity Interface: Simple and Specific(click image for larger view)
Opacity is more personally interesting to me than it is something we'd need for the lab. It's also something I need more time to explore. ScreenFlow is almost instantly intelligible. But Opacity will require a bit more investigation on my part before I decide whether or not I need it. Since many of my icons are hand drawn with a Wacom, I'll need to investigate the level to which this will be possible in Opacity.
But there are two things I want to point out about Opacity. One, I like the idea of it very much, and I think it's actually fairly novel on the Mac. I'm sure professional icon designers are loving that this exists and that it might actually turn out to be good. Two, it seems to be a very well-though out application. I think icon design is actually a much more complex task than screencast recording. But Opacity strikes a really good balance between the complexity of the task and a clean, elegant UI. It might not be right for me in the end, but if you design computer graphics of any kind, you should certainly take Opacity for a spin.
Oh, and one other thing about Opacity I'd like to mention: Its latest version (1.0.1) resolves every issue I mentioned in my initial article.
So, my thanks to the creators of these fine applications. Not only have they made what look like a couple of really neat apps, but they've handled initial criticism with the aplomb worthy of a Mac Developer.
Great work, guys!
UPDATE:
Testing of Opacity continues, and not without issue. The program is a good deal more solid than it was in version 1.0, but, for the record, attempting to import very large Illustrator documents causes the "Out of memory" alert to rear its ugly head once again. This alert will cause the application to quit. And, unfortunately, the default behavior of Opacity is to open the previous document on launch. If that document happens to be a large Illustrator file that causes the alert and subsequent quit of the program, you will be unable to successfully launch Opacity without moving the offending file. Bummer.
Also of note, Opacity is not currently pressure-sensitive when used with a Wacom tablet, which may be a bit of a problem for some — myself included — though perhaps not a deal-breaker. I'm certainly not averse to creating line-art in pressure-sensitive programs (like Illustrator) and importing them into an app like Opacity if it beats my previous workflow. But obviously this won't work if the Illustrator file essentially kills Opacity.
In any case, like I said, this is all for the record. I still feel Opacity has great potential. That's why I'm testing it so rigorously.


